How It's Done Getting The Insider's Perspective |
||
|
|
There are times when every photographer gets lucky and captures an image that is simply magnificent. Often, this image is the product of a great deal of serendipity – right camera, right place, right time, right subject. More often than not, however, there is far more than simple luck involved. When I started my photographic career I did so without the help of a mentor. Basically, I bought what seemed like a decent camera and just did my best. I read a lot, I practiced a lot, and I kept track of everything I did in little notebooks that I carried with me. I learned a great deal through the process of trial and error and (like any novice) I tended to be a little heavy on error. Today, I am experienced enough not to require the little notebooks unless I am doing something new. I’ve figured out the ideas of framing, lighting, backgrounds, and all of the other million-and-one details that go into a nice photograph. And there is always that one question that people can’t help but ask – “How do you do it?” In particular, these questions seem to be asked about photographs of birds. This is probably because birds are fairly easy to see and, thus, people have plenty of opportunity to try and take photos of them. Generally, however, the photos that people take are less than what they had hoped for. This is what irks them and provokes the question, “How?” Well, let me take some of the mystery out of how it is done. First, I’ll look at the equipment. All of photography is centered around the camera and cameras come in two basic types: point-and-shoot (PAS) or single lens reflex (SLR). The difference between the two has to do with the lenses used to focus the light that enters the camera. Point-and-shoot cameras have one fixed lens that generally falls into the “All Purpose” category, while SLR’s have interchangeable lenses for different jobs. It is quite easy to take photos with PAS cameras, but in my experience they tend to generate photos that are very flat. Everything is always in focus and the photos all tend to look the same. This is perfectly fine for photos of family gatherings, but not all that great for nature photography. SLR’s are definitely the way to go. So you get yourself a SLR and the first thing you realize is that the lens that came with it is nowhere near powerful enough to take the photos you want. Even if you are 30 feet away from a robin in your lawn, you are going to need a big lens. How do I know this? Error after error after error. When I was just getting started I took photos of all kinds of birds and when I got the photos developed I realized that I had done nothing more than take photos of specks. |
|
 |
Step 1: The Big Lens It took me a while to work up the courage to do it, but I finally had to invest in a big, powerful lens that could reach out to the animals I wanted to photograph. Specifically, I bought a Nikon f/2.8 400mm lens with a 2x teleconverter. The teleconverter doubled the magnification power of the lens, which was thus rendered the equivalent of an 800mm lens – about the equivalent of a 10x spotting scope.
|
|
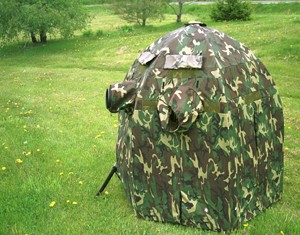
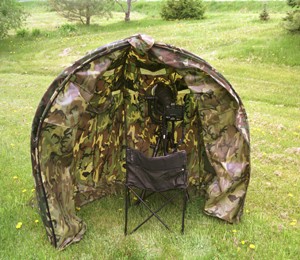
Step 2: The Blind But that’s not all. As I’m sure you’ve noticed, birds have keen eyesight and are often rather skittish around people. This can make getting to within 100 feet a challenge, never mind the 30 feet needed for a good shot. The only solution is to spend a little more money (about $250) on a portable photography blind. My mom gave me the little folding chair that I use inside the blind, so I’m not counting that in the cost of the gear. Believe it or not, that was the easy part. Anyone can buy the equipment, but not everyone is necessarily able, or willing, to invest the most important ingredient into the photographic process –time. Sometimes good photos just happen, but more often than not it requires a lot of time. And not all time is the same. |
 |
|
|
Step 3: Time!!!!!!! I could spend 10 hours a day in a photo blind for three months straight and I would probably have no luck getting a picture of a polar bear walking down the Mohawk Trail. If I were indeed looking for polar bears, I would be wasting my time. The basic message here is you have to know where to look for what you’re looking for. Better yet is this: look for what you can find wherever you are. I do not always enjoy this luxury because I need so many different photos of so many different plants and animals, but it still amazes me how many of the photos I have published have been taken in my back yard. It is simply a matter of being observant, patient, and willing to endure a little discomfort. I add that last little bit because I am 6’5” and the photo blind is only 4’ tall at its highest point. |
|
Practice rounds out the skills of any photographer, and again there is a lot of learning done by trial and error. In particular, a photographer has to spend a lot of time looking at the background of a photo and not just fixate on the subject. For instance, you might take a gorgeous picture of a Canada goose only to find that, once you have the pictures back in your hand, there is an awful reflection of a telephone pole in the water. What could have been a nice photo is now added to the “If Only” pile. There is a great deal more in the nitty-gritty details end of things, but now you hopefully have a basic idea of what goes into some of my photos. Lots of scouting, lots of planning, and lots of time are all key components, but I cannot be completely honest unless I also admit to a fair bit of luck. Even with all of the right equipment you can’t take a photo of nothing. Some days are unreasonably productive, while others seem unfairly unproductive. I remember one time in particular when I was sitting in my blind, in the middle of winter, in the hopes of getting some good pictures of chickadees, titmice, and the like. I had absolutely no idea that a shrike would appear! Somehow, the right camera with the right film was pointed in the right direction at the right time and the right bird stopped in front of me for just a moment. I saw, I clicked, I conquered. My next photography project is moose. I will bring my blind and all of the tricks I have learned and do my best to be successful. You will find out soon enough if you see moose photos in the next couple weeks. If not, I’ll just have to try again another time. Copyright 2010 William Danielson |
||